背景说明
操作系统版本,红帽RHEL9版本
 1
 2
 3
 4
 5
 6
 7
 8
 9
10
11
12
13
14
15
16
17
18
19
|
[root@localhost ~]# cat /etc/os-release
NAME="Red Hat Enterprise Linux"
VERSION="9.5 (Plow)"
ID="rhel"
ID_LIKE="fedora"
VERSION_ID="9.5"
PLATFORM_ID="platform:el9"
PRETTY_NAME="Red Hat Enterprise Linux 9.5 (Plow)"
ANSI_COLOR="0;31"
LOGO="fedora-logo-icon"
CPE_NAME="cpe:/o:redhat:enterprise_linux:9::baseos"
HOME_URL="https://www.redhat.com/"
DOCUMENTATION_URL="https://access.redhat.com/documentation/en-us/red_hat_enterprise_linux/9"
BUG_REPORT_URL="https://issues.redhat.com/"

REDHAT_BUGZILLA_PRODUCT="Red Hat Enterprise Linux 9"
REDHAT_BUGZILLA_PRODUCT_VERSION=9.5
REDHAT_SUPPORT_PRODUCT="Red Hat Enterprise Linux"
REDHAT_SUPPORT_PRODUCT_VERSION="9.5"
|
1、安装EPEL存储库
首先执行命令sudo yum install epel-release -y 进行安装,-y参数会自动安装,安装过程中无需手动敲y
可能会出现找不到匹配的软件包
1
2
3
4
5
|
[root@localhost ~]# sudo yum install epel-release -y
Updating Subscription Management repositories.
Last metadata expiration check: 2:16:32 ago on Mon 13 Jan 2025 07:12:38 PM CST.
No match for argument: epel-release
Error: Unable to find a match: epel-release
|
解决方法:
启用EPEL存储库,需要安装yum-utils软件包,然后使用yum-config-manager命令启用EPEL存储库,执行以下命令:
1
2
|
sudo yum install -y yum-utils device-mapper-persistent-data lvm2
sudo yum-config-manager --enable epel
|
然后再尝试安装epel-release软件包,执行以下命令
1
2
3
4
|
sudo yum install epel-release

# 注:如果该条命令依旧显示无法找到匹配的软件包,可以尝试使用以下命令(个人是使用这个命令执行成功的)
# sudo yum install https://dl.fedoraproject.org/pub/epel/epel-release-latest-9.noarch.rpm
|
安装epel-release后,更新系统包缓存,执行以下命令
1
2
3
|
sudo yum clean all
sudo yum makecache
sudo yum update
|
2、设置docker的yum源
执行以下命令,在yum中添加docker源
1
|
sudo yum-config-manager --add-repo https://download.docker.com/linux/centos/docker-ce.repo
|
3、安装docker
在正式安装docker之前,如果当前主机中安装的有旧版docker或者不是docker-ce的版本,先进行卸载,执行命令
1
2
3
4
5
6
7
8
|
sudo yum remove docker \
                docker-client \
                docker-client-latest \
                docker-common \
                docker-latest \
                docker-latest-logrotate \
                docker-logrotate \
                docker-engine
|
开始安装docker-ce、docker-ce-cli、containerd.io,执行以下命令
1
|
sudo yum install -y docker-ce docker-ce-cli containerd.io docker-buildx-plugin docker-compose-plugin
|
然后等待完成安装即可
4、docker配置文件
使用vi/vim编辑vim /etc/systemd/system/docker.service文件,将以下内容写入该文件中
 1
 2
 3
 4
 5
 6
 7
 8
 9
10
11
12
13
14
15
16
17
18
19
20
21
22
23
24
25
26
27
28
29
30
31
32
33
34
35
36
37
38
39
40
41
42
43
44
45
46
47
|
[Unit]
Description=Docker Application Container Engine
Documentation=https://docs.docker.com
BindsTo=containerd.service
After=network-online.target firewalld.service containerd.service
Wants=network-online.target
Requires=docker.socket

[Service]
Type=notify
# the default is not to use systemd for cgroups because the delegate issues still
# exists and systemd currently does not support the cgroup feature set required
# for containers run by docker
ExecStart=/usr/bin/dockerd -H fd:// --containerd=/run/containerd/containerd.sock
ExecReload=/bin/kill -s HUP $MAINPID
TimeoutSec=0
RestartSec=2
Restart=always

# Note that StartLimit* options were moved from "Service" to "Unit" in systemd 229.
# Both the old, and new location are accepted by systemd 229 and up, so using the old location
# to make them work for either version of systemd.
StartLimitBurst=3

# Note that StartLimitInterval was renamed to StartLimitIntervalSec in systemd 230.
# Both the old, and new name are accepted by systemd 230 and up, so using the old name to make
# this option work for either version of systemd.
StartLimitInterval=60s

# Having non-zero Limit*s causes performance problems due to accounting overhead
# in the kernel. We recommend using cgroups to do container-local accounting.
LimitNOFILE=infinity
LimitNPROC=infinity
LimitCORE=infinity

# Comment TasksMax if your systemd version does not support it.
# Only systemd 226 and above support this option.
TasksMax=infinity

# set delegate yes so that systemd does not reset the cgroups of docker containers
Delegate=yes

# kill only the docker process, not all processes in the cgroup
KillMode=process

[Install]
WantedBy=multi-user.target
|
使用vi/vim编辑vim /etc/systemd/system/docker.socket文件,将以下内容写入该文件中
 1
 2
 3
 4
 5
 6
 7
 8
 9
10
11
12
|
[Unit]
Description=Docker Socket for the API
PartOf=docker.service

[Socket]
ListenStream=/run/docker.sock
SocketMode=0660
SocketUser=root
SocketGroup=root

[Install]
WantedBy=sockets.target
|
5、配置docker的daemon.json
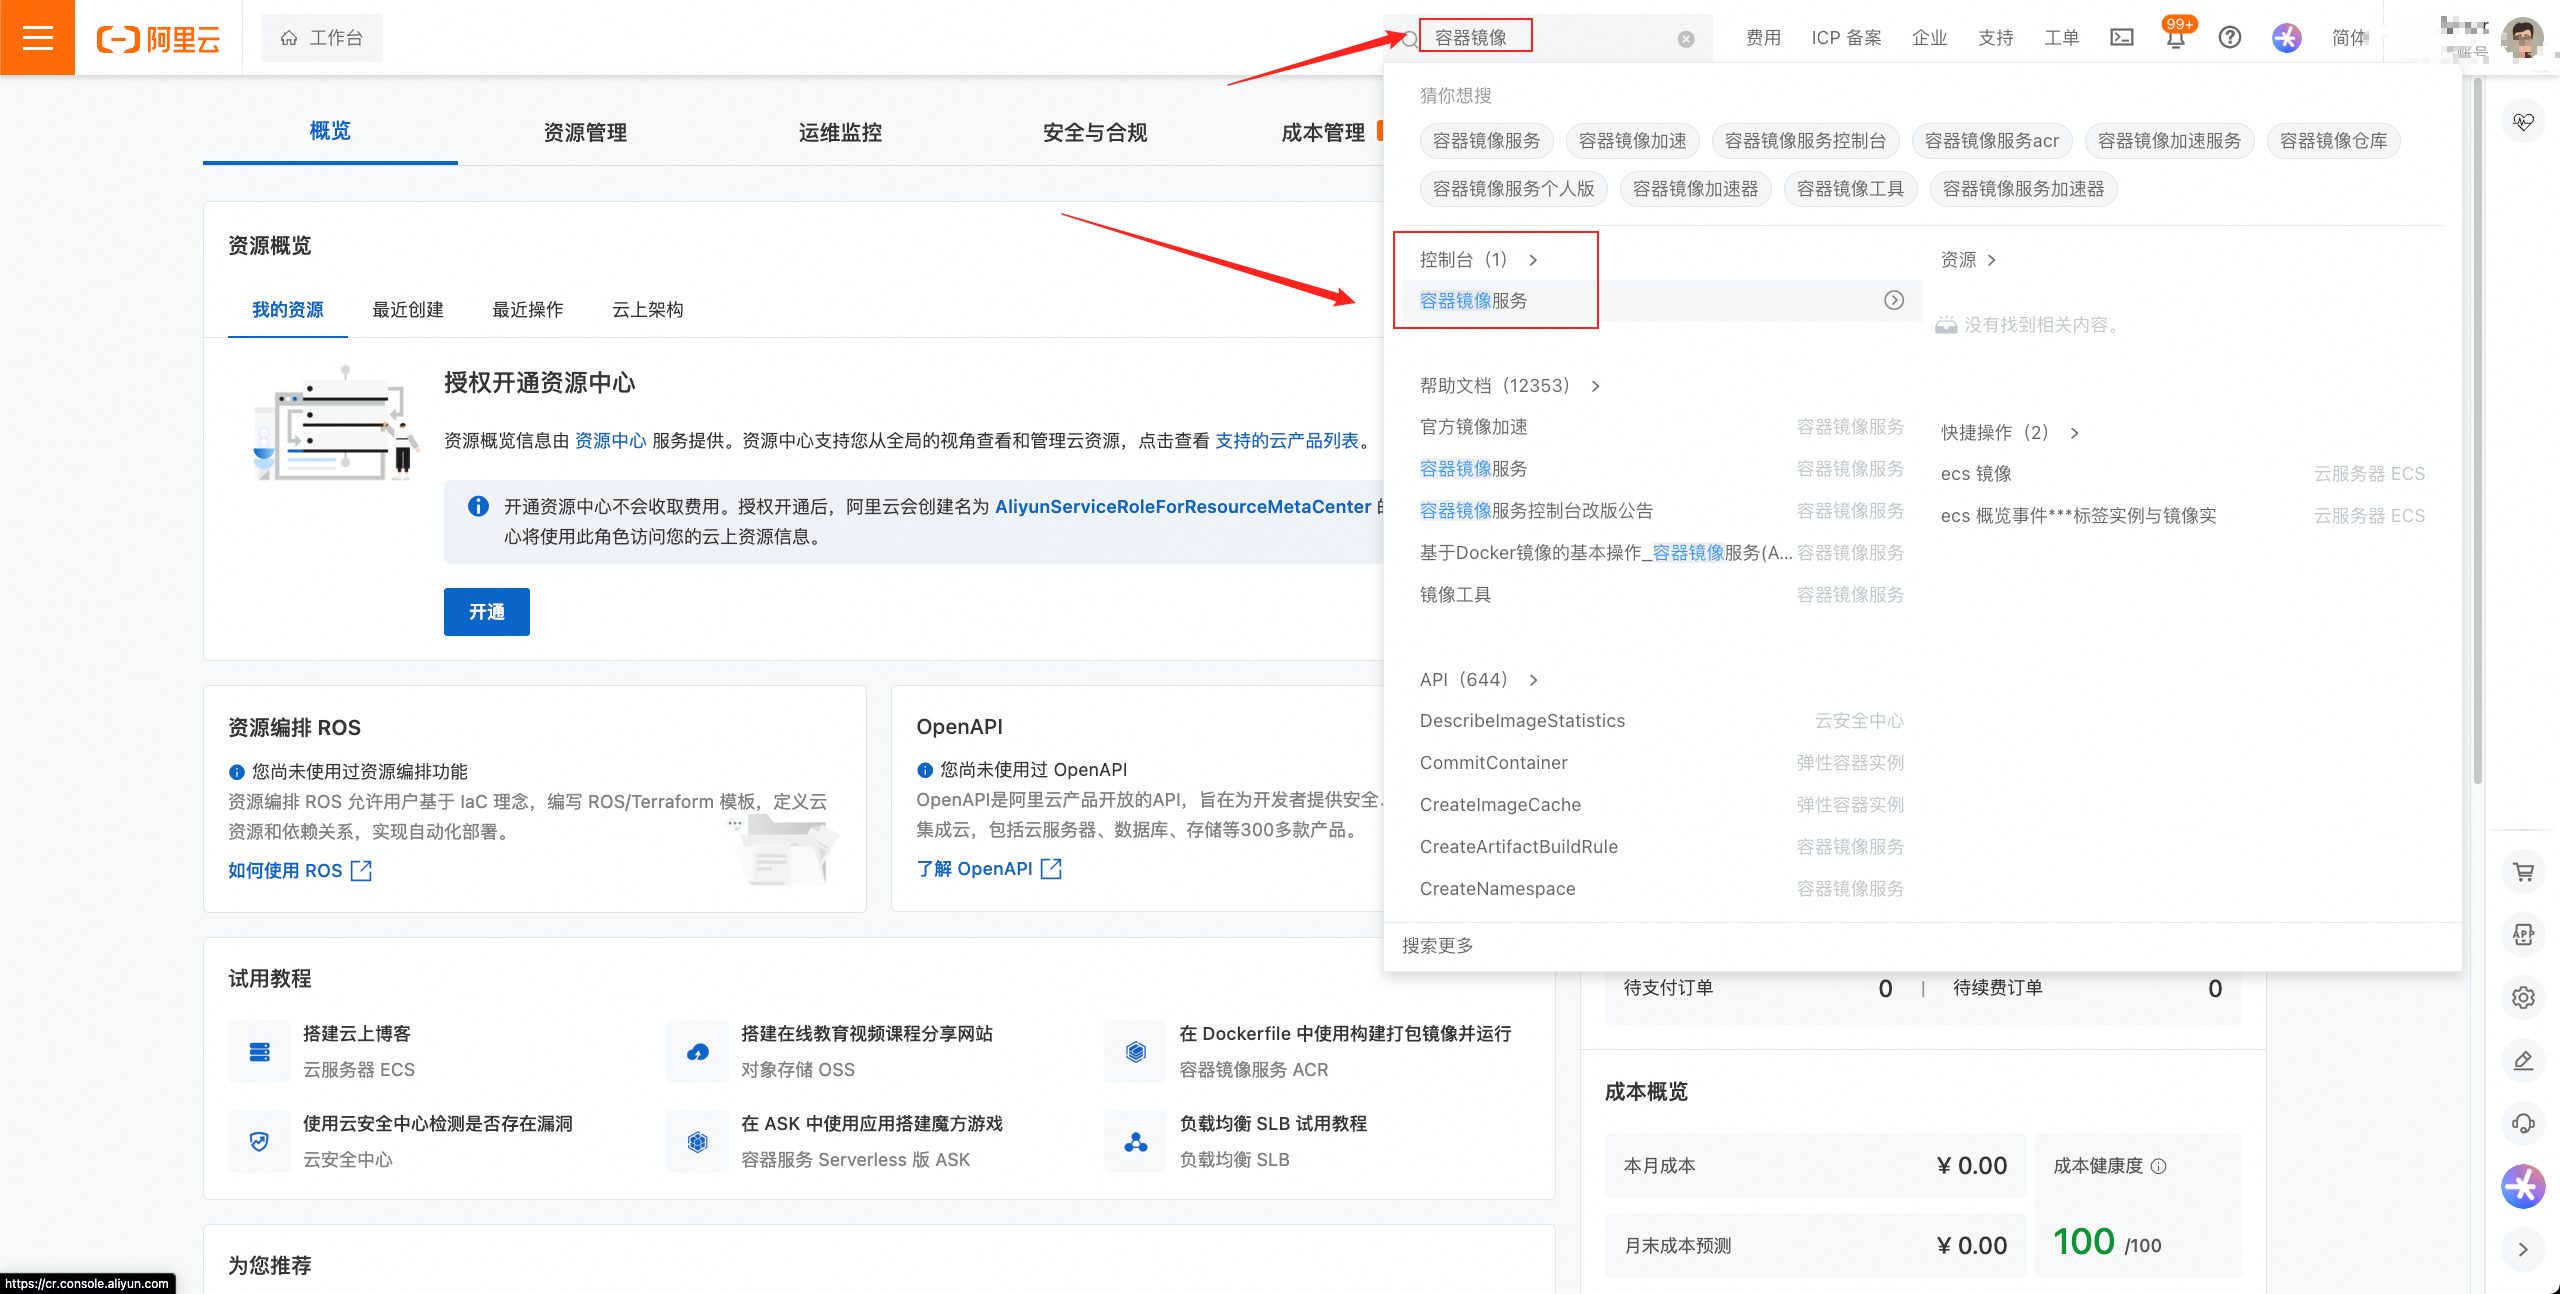
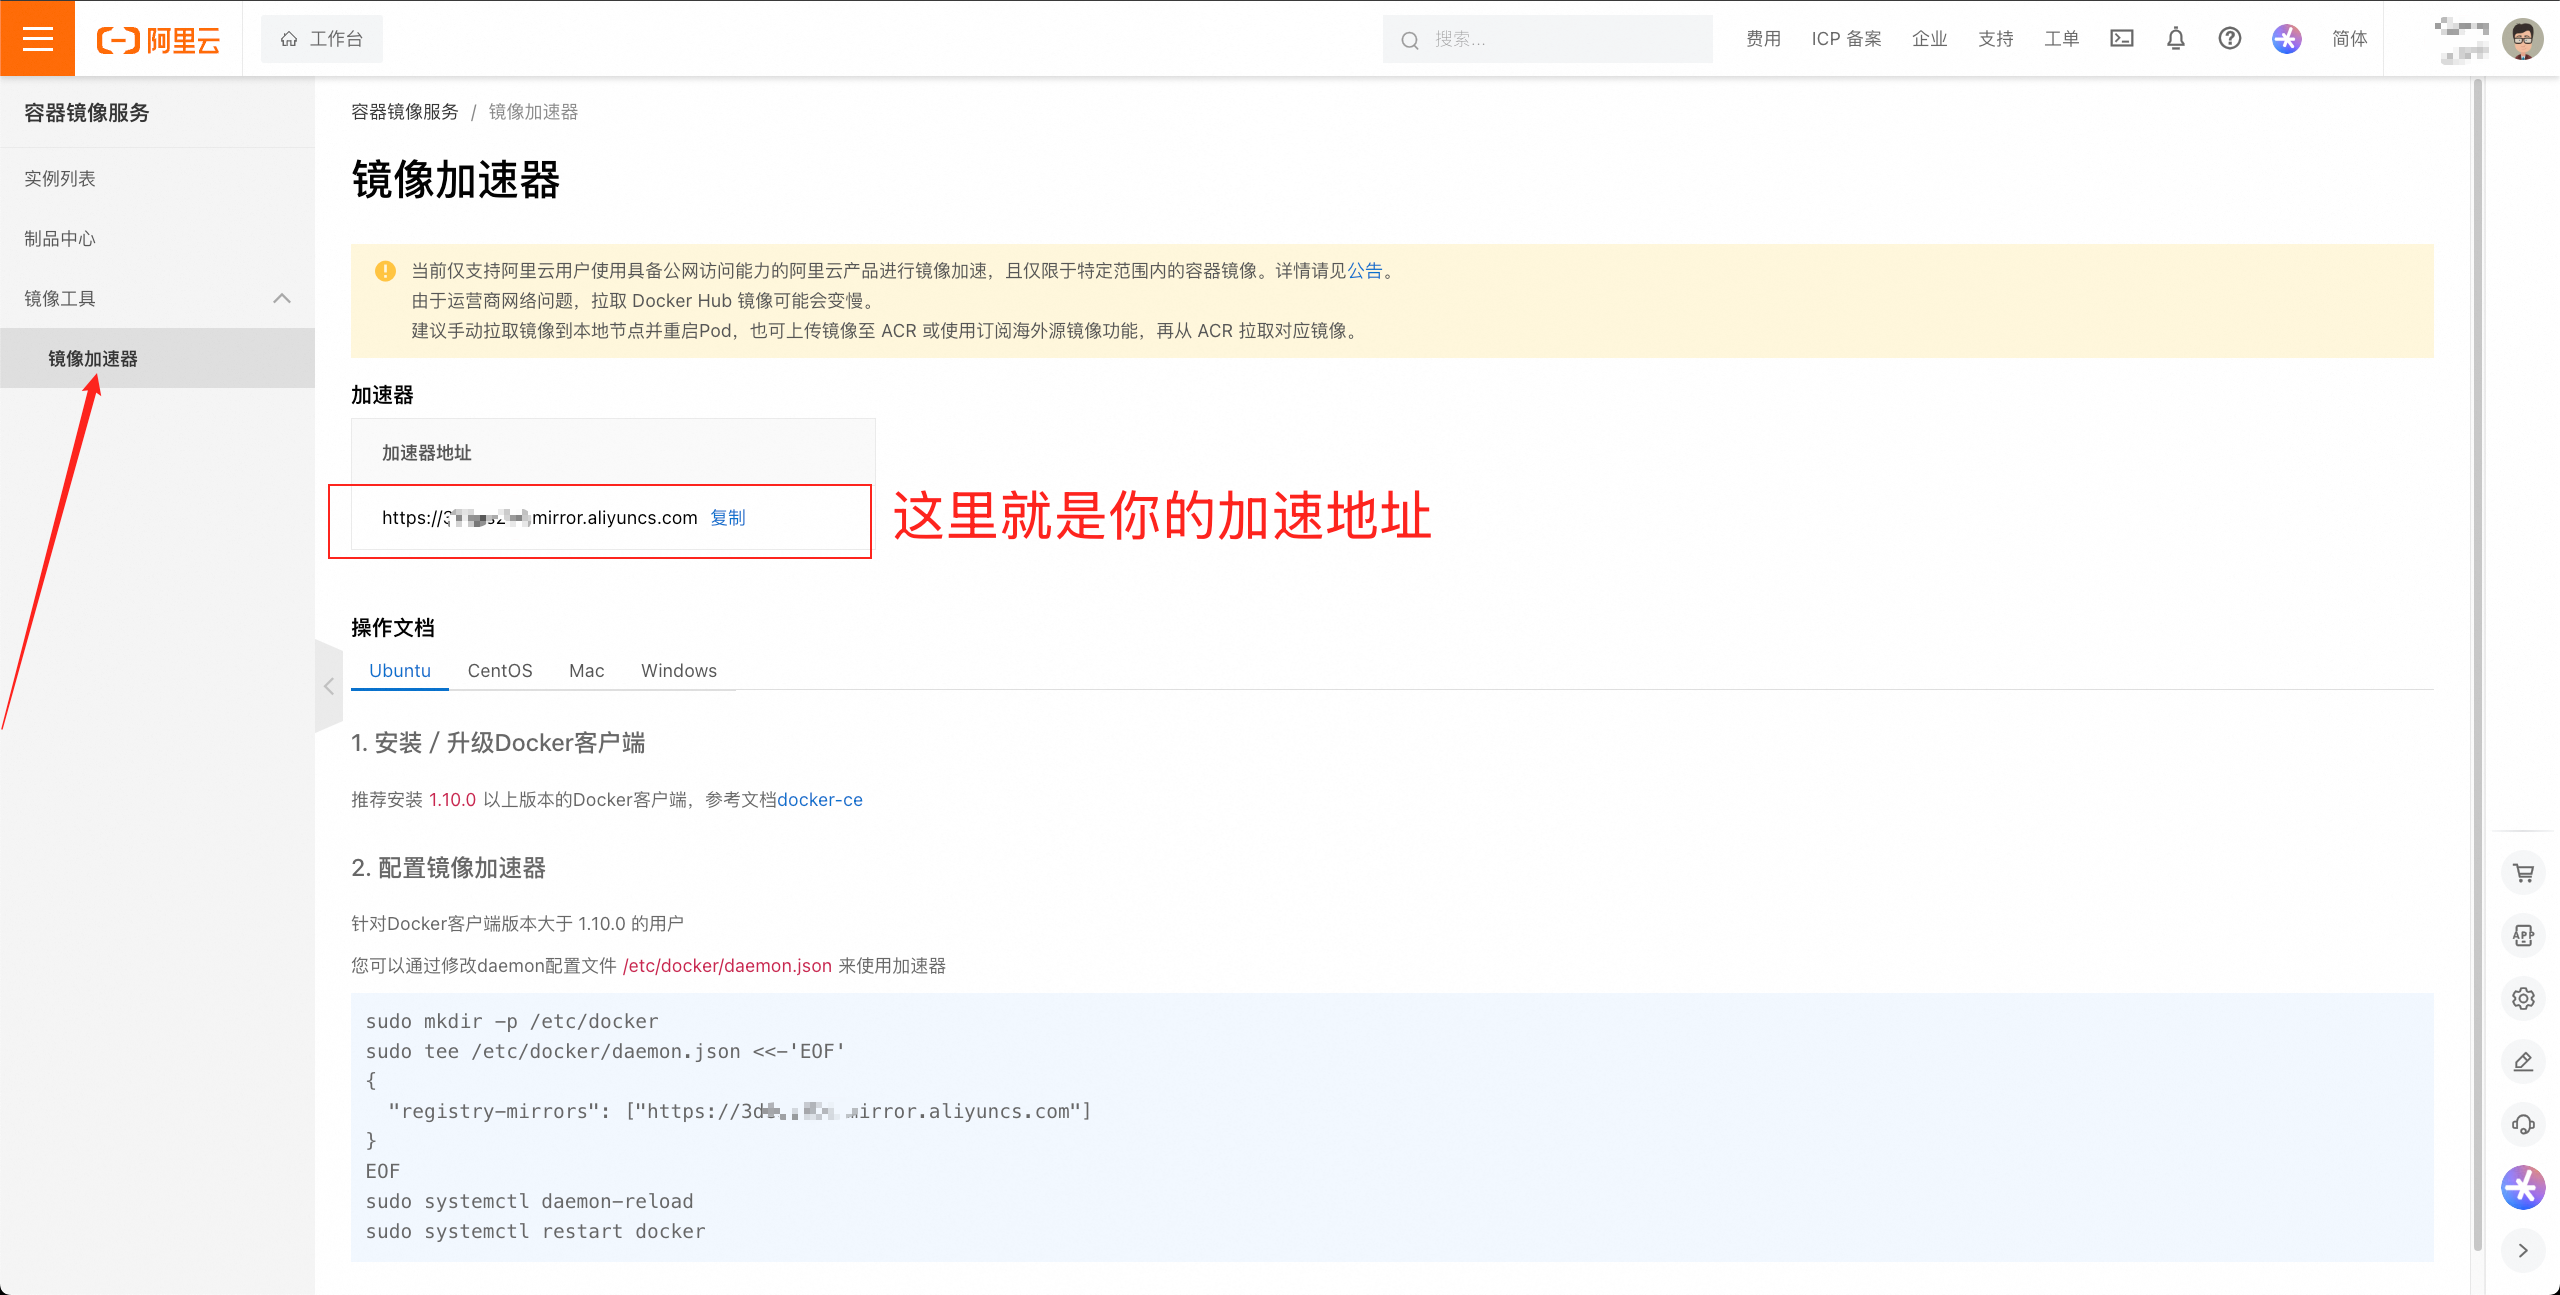
首先登陆阿里云账号,阿里云地址:https://cn.aliyun.com/,找到并点击控制台,然后搜索:容器镜像服务。点击进入


然后编辑文件vim /etc/docker/daemon.json,将以下内容写入你的daemon.json文件中
 1
 2
 3
 4
 5
 6
 7
 8
 9
10
11
12
13
14
15
16
17
18
19
20
21
22
|
{
  "dns": ["8.8.8.8", "8.8.4.4"],
  "registry-mirrors": [
    "https://你的阿里云镜像加速地址",  // 注:该行自行添加你自己阿里云的镜像加速地址
    "https://registry.docker-cn.com",
    "http://hub-mirror.c.163.com",
    "https://docker.mirrors.ustc.edu.cn",
    "https://omh8vcpy.mirror.aliyuncs.com",
    "https://docker.m.daocloud.io/",
    "https://huecker.io/",
    "https://dockerhub.timeweb.cloud",
    "https://noohub.ru/",
    "https://dockerproxy.com",
    "https://docker.mirrors.ustc.edu.cn",
    "https://docker.nju.edu.cn",
    "https://xx4bwyg2.mirror.aliyuncs.com",
    "http://f1361db2.m.daocloud.io",
    "https://registry.docker-cn.com",
    "http://hub-mirror.c.163.com",
    "https://docker.mirrors.ustc.edu.cn"
  ]
}
|
然后重新加载守护进程,执行命令sudo systemctl daemon-reload
6、启动docker
启动docker
1
|
sudo systemctl start docker
|
至此docker安装完毕,并且启动成功
7、docker其他相关命令
重启docker服务
1
|
sudo systemctl restart docker
|
拉取docker镜像,既然是软件,那么怎么能少的了我们的HelloWorld呢,此处就以拉取hello-world镜像为例,执行命令docker pull 你要拉取的镜像名及版本包,注:若没有版本号,那么拉取的就是最新的(latest)版本
1
|
docker pulll hello-world
|
查看docker已拉取下来的镜像有哪些


